US
 Australia
 United Kingdom
 Europe
NOLATHANE Bushing Press Kit
IMPROVE GRIP, HANDLING & PERFORMANCE.
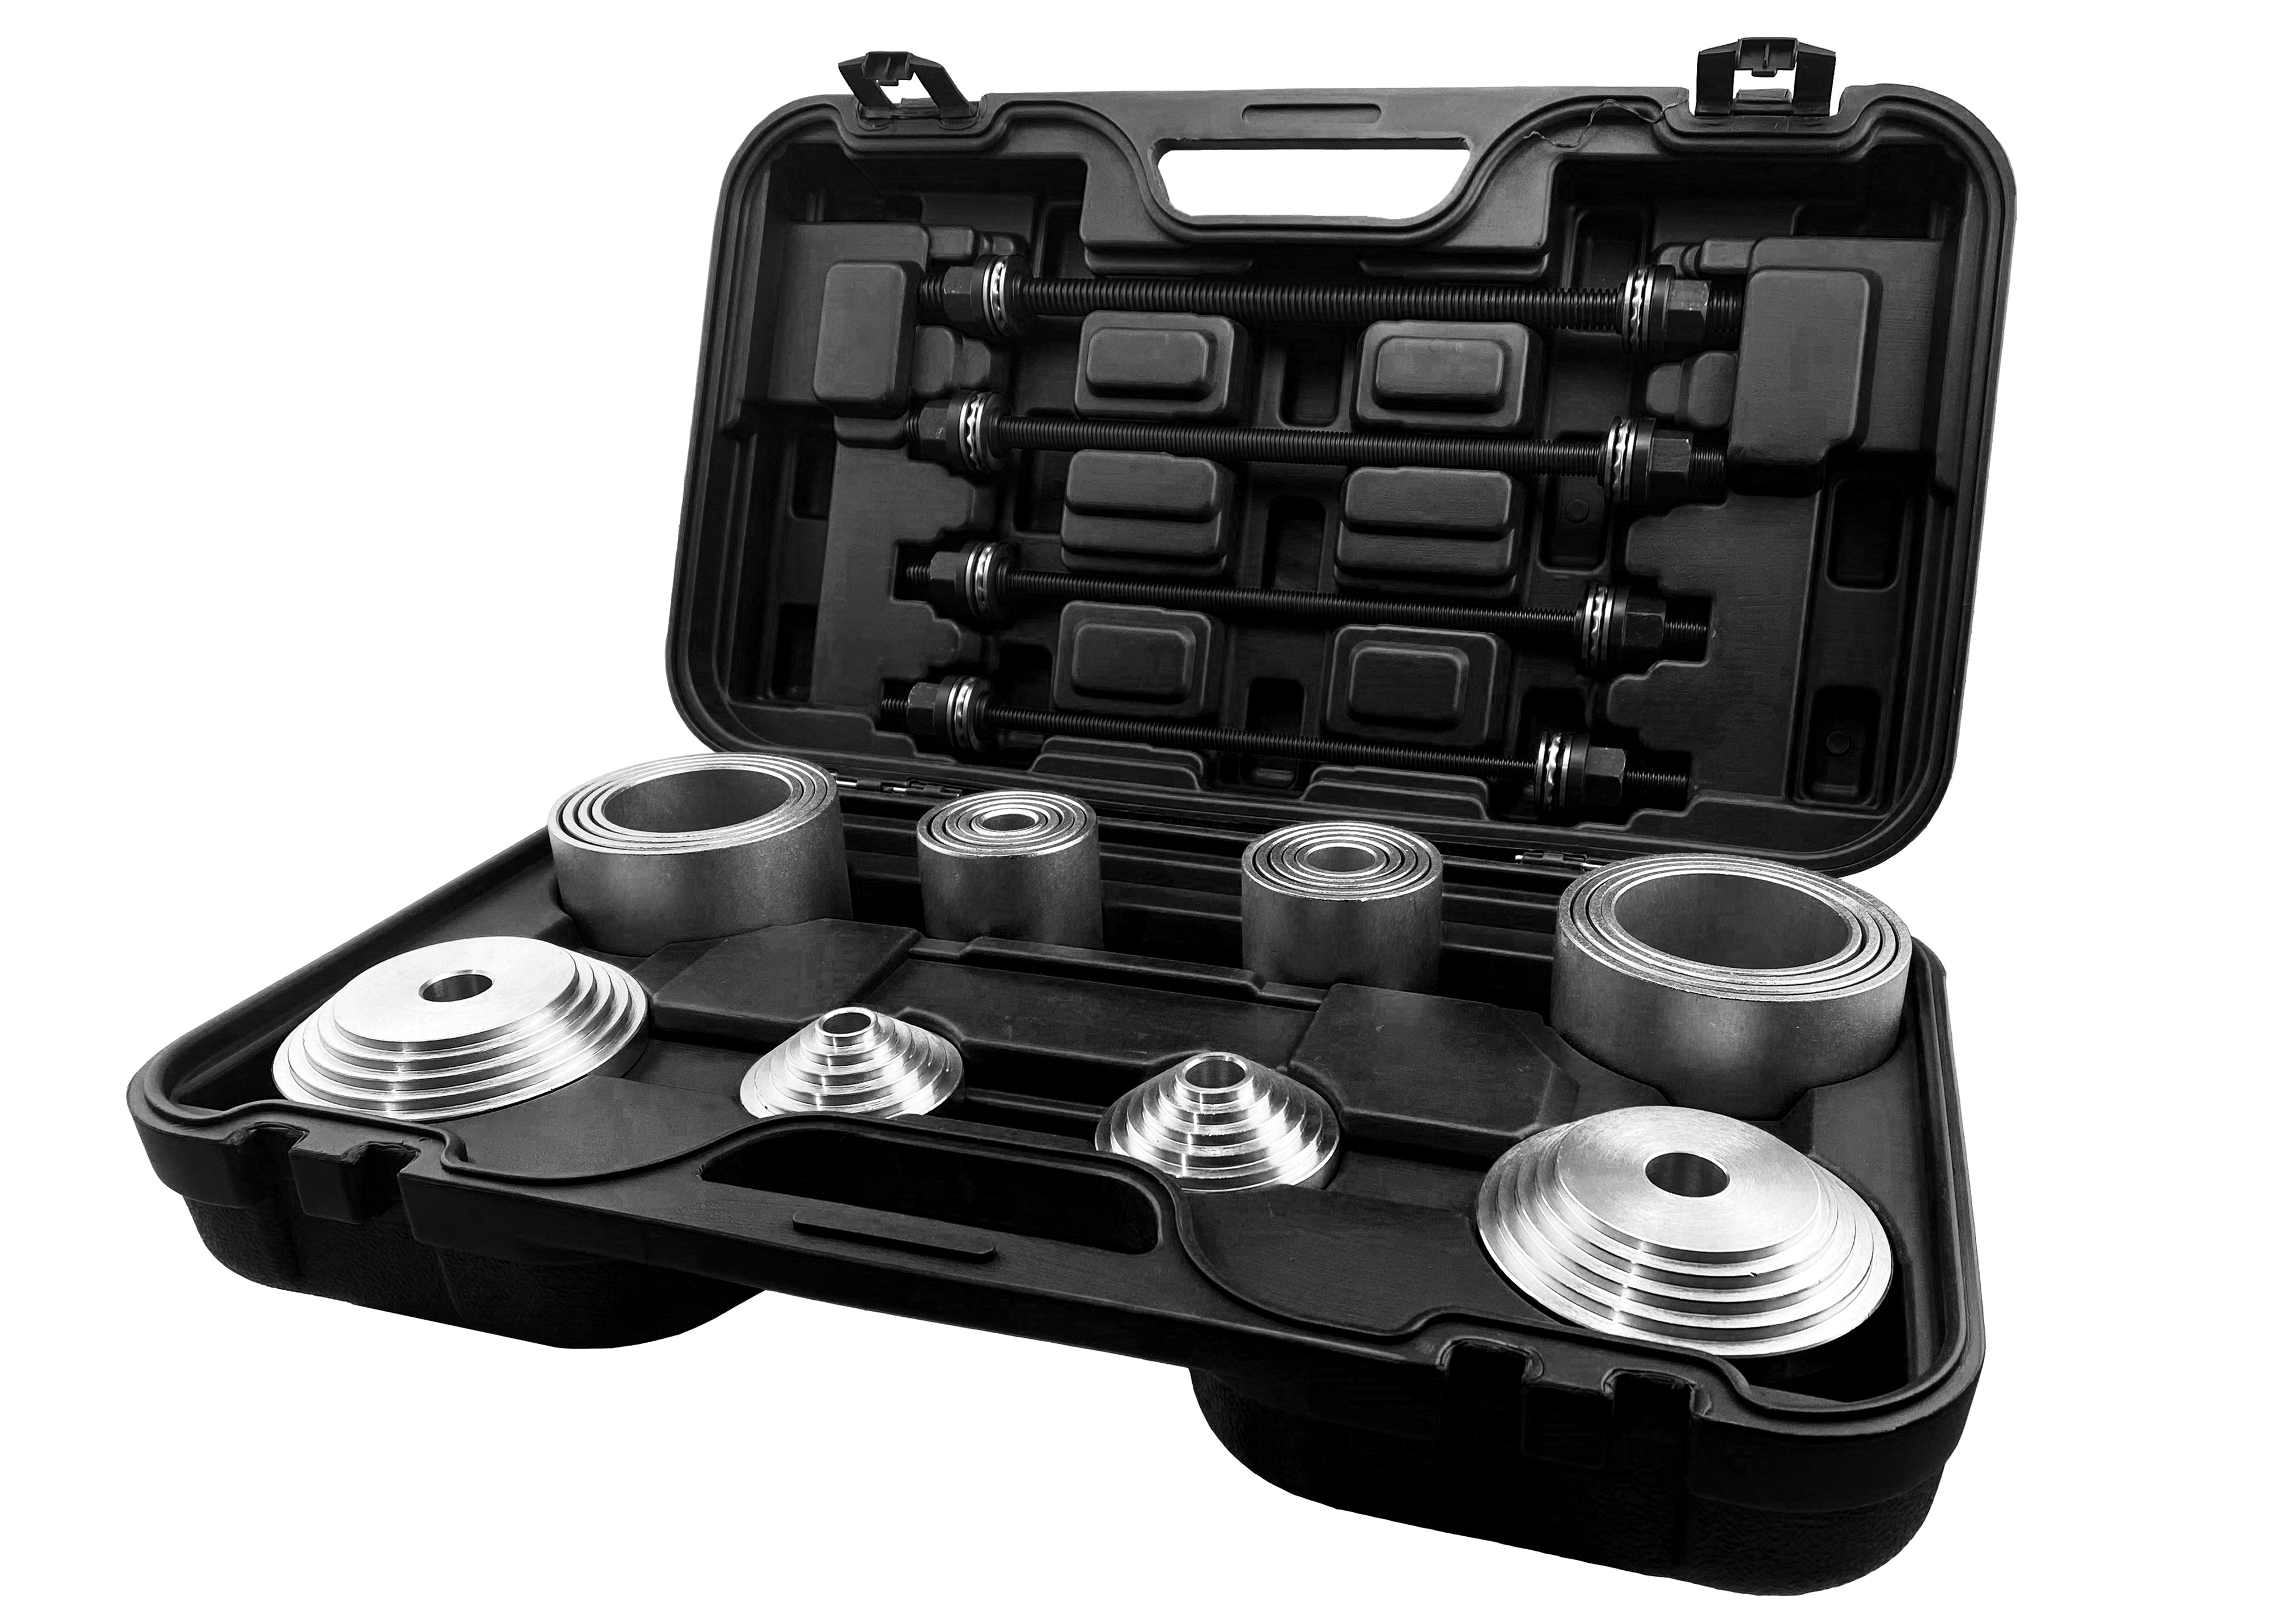
A Nolathane bushing press kit is a universal press and pull tool that removes and installs suspension bushings squarely and under control. It works as both a bushing removal tool and a bushing press, so one kit handles both halves of the job: pulling the old bushing out, and drawing the new one in until it?s fully seated. The kit is designed for... Read more
A Nolathane bushing press kit is a universal press and pull tool that removes and installs suspension bushings squarely and under control. It works as both a bushing removal tool and a bushing press, so one kit handles both halves of the job: pulling the old bushing out, and drawing the new one in until it?s fully seated.
The kit is designed for shops and DIY owners who replace control arm, subframe and trailing arm bushings. Many bushings can be changed on the vehicle without removing the arm, and the kit also works in a bench or shop press when the part is easier to handle off the vehicle. Each listing shows the contents and size range.
How a Press and Pull Kit Works
A press and pull kit uses a simple principle: a threaded rod and nut, turned slowly, can generate a large, steady force.
The bushing sits between two cups. On one side, a pressing cup bears against the bushing. On the other side of the bore, a receiver cup gives the bushing somewhere to go. The threaded rod passes through both cups and the bushing. As you tighten the nut, the cups are drawn together, which pushes the bushing steadily through the bore and into the receiver cup.
To fit a new bushing, the setup is reversed. The new bushing is placed at the mouth of the bore, and tightening the nut draws it in until it?s fully seated.
Because the force comes from a turning nut rather than a hammer, it?s controlled and even. The bushing moves in a straight line, and you can stop at any point to check the alignment. That?s what makes a press and pull kit far more precise than hammering or improvising with sockets and a long bolt.
Kit Components Explained
Each part of the kit has a specific job. Each listing shows the contents.
Threaded Rod and Nut
The threaded rod, sometimes called the forcing screw, is the backbone of the kit. It carries all the force of pressing. The nut turns on the rod to draw the cups together. Some kits include a thrust bearing under the nut, which reduces friction so the nut turns more easily under load and the force goes into the bushing, not into fighting the threads.
Pressing Cups and Receiver Cups
Pressing cups push against the bushing. Receiver cups sit on the other side of the bore, catching the old bushing as it comes out, or supporting the arm while the new one goes in. The cups come in several diameters, so the kit can handle a range of bushing sizes.
Adapter Plates and Sleeves
Adapter plates and sleeves fill the gap between the cups and the bushing or arm. They let the kit work on bushings of different sizes, and help the cups sit squarely on uneven or shaped surfaces.
Removing and Installing Bushings On or Off the Vehicle
One of the biggest advantages of a press and pull kit is that it can often be used on the vehicle.
On the vehicle. Many control arm and subframe bushings can be pressed out and in while the arm or subframe stays in place. That makes the kit an effective control arm bushing tool, and a subframe bushing removal tool for bushings within its size range. Working on the vehicle saves removing the arm, which can save a lot of time, especially on rear suspensions where removing an arm means disturbing the alignment, the brakes or the driveshafts. Trailing arm bushings can often be changed the same way.
Off the vehicle. Some bushings are easier to change with the arm on the bench. The kit works there too, either by hand in a vise or as a set of cups and adapters in a bench press or hydraulic shop press. Used in a press, the kit?s cups make it easy to support the arm squarely and press the bushing straight.
Which approach is best depends on the access. If there?s room to fit the cups and turn the nut, on-vehicle use is usually quicker. If access is tight, or the bushing is very tight in its bore, removing the arm and using a shop press is often easier.
Matching Cups to Bushing Sizes
Choosing the right cups is the key to using the kit well.
- For pressing, choose a pressing cup that matches the bushing?s outside diameter. It should bear on the bushing?s outer shell or edge, not on the rubber or polyurethane in the center.
- For receiving, choose a receiver cup with an inside diameter slightly larger than the bushing?s outside diameter, so the bushing can pass into it freely. The receiver cup?s rim must sit on the arm around the bore.
- Check clearance. Make sure the cups clear any brackets, welds or other parts near the bushing, and that the rod passes straight through.
A universal kit covers a set size range, not every bushing on every vehicle. Each listing shows the size range, so you can check that it suits the bushings you work on.
Pressing Technique for Polyurethane and Rubber Bushings
Good technique makes the job easier and protects the bushing, the bore and the tool:
- Clean and lightly lubricate the bore. Remove rust and old rubber, and apply a light coat of a suitable lubricant so the new bushing slides in smoothly.
- Start the bushing square. Make sure it?s aligned with the bore before applying force. A bushing that starts crooked will stay crooked.
- Turn the nut steadily. Use slow, even turns, rather than short, sharp bursts.
- Watch the alignment. Check that the cups and the bushing stay square to the bore as you go.
- Stop and reset if it binds. If the nut suddenly gets much harder to turn, stop, back off, and re-align before continuing.
Polyurethane and rubber bushings behave differently. Many polyurethane bushings are two-piece designs with a separate sleeve, and they press in by hand or with light force. Bonded rubber bushings, with their metal outer shell, usually need much more force to remove. Older rubber bushings may be seized in the bore, and sometimes need careful heat on the outer shell, or cutting, before they?ll move.
Build Quality and Care
A press and pull kit takes a lot of force, so its build quality matters. The kit uses steel components for the rod, cups and adapters, so they can handle the loads involved in pressing suspension bushings.
A little care keeps the kit working for years:
- Grease the threads and bearing before each use. Dry threads wear quickly and make the nut much harder to turn.
- Keep the cups clean and dent-free. A dented cup won?t sit squarely, which leads to crooked pressing.
- Store the kit in its case, so the cups and adapters stay together and protected.
- Inspect the rod for damaged or stretched threads, and replace it if it shows wear.
Using a Bushing Press Safely
A bushing press stores a lot of force under load, so treat it with care:
- Secure the arm or vehicle before applying force. The vehicle must be safely supported on stands, and a loose arm must be held in a vise.
- Wear eye protection. Parts under load can crack or slip suddenly.
- Don?t use an impact wrench unless the tool maker allows it. Impact tools can damage the threads and overload the rod.
- Don?t exceed the rod?s capacity. If the bushing won?t move with reasonable force, stop and reconsider the approach.
- Watch for cups splitting or deforming under load. A cup that starts to distort should be replaced before it fails.
Limitations and Trade-Offs
- The kit covers a set size range, not every bushing
- Heavy-duty truck spring bushings may need hydraulic tooling
- Seized or rusted shells may need heat or cutting to remove
- Some positions need the arm removed for access
Shop Bushing Press Kits
If you need help choosing the right cups and adapters for a particular bushing, our local support team can help.
This kit is listed in our workshop tools selection for shops and home garages.
Find the right bushing press kit for your shop or garage, and order online with fast shipping.
1 item
 In StockShips within 24hrs.Ships within 24hrs.SKU: RTK001
Universal Press/Pull Tool Kit
In StockShips within 24hrs.Ships within 24hrs.Qty Required 1$249.87
Your vehicle
Matching vehicles
No match — try selecting it below.
Refine your search
Clear all- Alignment Parts 2
- Camber Bolts 2
- Bushings 1877
- Alignment Pins and Bushings 7
- Axle Bushings 26
- Body Mount Bushings 89
- C-Bushings 6
- Coil Spring Insulators 14
- Coil Spring Spacers 29
- Control Arm Bushings 755
- Differential Bushings 47
- Fifth Wheel Bushing 1
- Lateral Arm Bushings 2
- Leaf Spring Bushings 41
- Leaf Spring Pads 5
- Leaf Spring Shackle Bushing 100
- Radiator Bushings 3
- Radius Arm Bushings 38
- Shock Bushings 33
- Steering Bushings 67
- Strut Mount Bushing 2
- Strut Rod Bushing 29
- Subframe Bushing 28
- Sway Bar Bushings 406
- Sway Bar Link Bushings 36
- Torsion Bar Bushing 2
- Track Bar Bushings 31
- Trailing Arm Bushing 71
- Transfer Case Bushings 4
- Trunnion Bushing 1
- Watts Link Bushing Kit 2
- Car Accessories 3
- Hood Bumper Stops 2
- Hood Latch Roller 1
- Control Arms 69
- Ball Joint 9
- Control Arm Kit 59
- Control Arm Assembly with Ball Joint 1
- Control Arm Kit - Lower 33
- Control Arm Kit - Upper 9
- Trailing Arm Kits 3
- Radius Arm 1
- Engine Bushings 54
- Engine Mount Bushings 54
- Exhaust Bushing 8
- Exhaust Mount Bushings 8
- Leveling Kits 6
- Nuts, Bolts & Screws 2
- Camber Bolt Kit 1
- Sway Bar & Sway Bar Kits 203
- Sway Bar Bracket 1
- Sway Bar Link 41
- Track Bar 2
- Transmission Parts 27
- Shifter Bushing 8
- Transmission Mount 19
- Universal Auto Parts 55
- Body Hardware 2
- Dust Covers 5
- Grease 1
- Rod End 7
- Spare Tire Carrier Mount 1
- Universal Bump Stops 38
- Winch Isolator 1
- Workshop Tools 3
- Bushing Press Kit 1
- Floor Jack Handle Clip 1
- Jack Holder Spring 1
No categories match.
Can’t find what you’re looking for?
Our team can help you find the right part — or tell us what was missing so we can improve the site.
Call Us +1 909-476-2860 Give Feedback (opens in a new tab)